Package a PopSyCLE Simulation for Contribution to the Project
[1]:
from astropy.table import Table
from astropy.io import ascii
import os
import sys
import numpy as np
from popclass.model import PopulationModel
from popclass.visualization import plot_population_model
import matplotlib.pyplot as plt
import pandas as pd
from pathlib import Path
/home/docs/checkouts/readthedocs.org/user_builds/popclass/envs/latest/lib/python3.11/site-packages/popclass/model.py:9: UserWarning: pkg_resources is deprecated as an API. See https://setuptools.pypa.io/en/latest/pkg_resources.html. The pkg_resources package is slated for removal as early as 2025-11-30. Refrain from using this package or pin to Setuptools<81.
  import pkg_resources
Read in the base-PopSyCLE data
The first step is to read in the output data from PopSyCLE. The relevant output for packaging a popclass model is contained in the file named: <root>_refine_events_<filter>_<reddeninglaw>.fits. It can be read in as an Astropy Table object, then converted to a pandas dataframe if desired.
[2]:
dir_path = str(Path().resolve())

table = Table.read(dir_path+"/data/sample_population_file_refined_events_ubv_I_Damineli16.fits")
table = table.to_pandas()
Perform pre-processing
Next, we can apply basic cuts or do any required post-processing to ensure the simulation is ready to be used. For example, one might want to remove unphysical microlensing events, such as events with dark sources.
NOTE: If trying to undo selection effects, do so with extreme caution. The classification procedure is robust to using the intrinsic population of events, and therefore works perfectly fine with an unmodified simulation (with regards to detectability). If trying to encode selection effects for whatever reason, one must utilize the detection effeciency for the relevant survey, in the population samples (going into the likelihood) and in the class_weights (the prior). Simply cutting out regions of parameter space (e.g., only including events with source magnitude < 21) is not a proper accounting of selection effects and might bias the classification result.
[3]:
table_filtered = table[ table["rem_id_S"] < 100]
Now, one might want to include any additional derivative information needed in the population model. For example, the classification procedure is typically done in log-space instead of linear \(t_E\) - \(\pi_E\), purely for numerical stability. To allow for that, the population model will need samples in \(\log_{10} t_E\) and \(\log_{10} \pi_E\).
[4]:
table_filtered["log10tE"] = np.log10(table_filtered["t_E"])
table_filtered["log10piE"] = np.log10(table_filtered["pi_E"])
table_filtered["mag"] = table_filtered["ubv_I_S"]
Organize the simulation data
From here, we can prep the data to be used to initialize a PopulationModel object. We will need
The names of the different classes. In this example, we are focusing on the physical class of the lens, so \(\text{class} \in \{\text{star},\text{white\_dwarf},\text{neutron\_star},\text{black\_hole} \}\).
The names of the model parameters included in the population model. This should include any parameters that are inferred from the data and needed to accurately classify the event (\(\log_{10} t_E\), \(\log_{10} \pi_E\), and the blending fraction, for example), as well as other parameters that might be wanted for additional analysis, like posterior predictive distributions. These can include things not directly accessible from the data, which might include distances, \(\theta_E\), or velocities.
We need to separate out the desired parameters from the full data set, labeled by class, which we call
population_data.Finally, as popclass does not depend on getting the relative probability of each class from the simulation data itself, but instead relies on the user for this information, we must provide the relative, expected abundance for each class, which we call
class_weights. This is the prior in the classification procedure.
[5]:
class_names = {"star":0,"white_dwarf":101,"neutron_star":102,"black_hole":103}
parameter_names = ["log10tE","log10piE","f_blend_I","rad_L","rad_S","ubv_I_S"]
population_data = { class_name : table_filtered.loc[table_filtered["rem_id_L"] == index, parameter_names].to_numpy() for class_name, index in class_names.items()}
class_weights = { class_name: sum(table_filtered["rem_id_L"] == index)/len(table_filtered) for class_name, index in class_names.items()}
citation = ["10.3847/1538-4357/ab5fd3", "10.3847/1538-4357/aca09d"]
Build the model object
With the relevant data extracted from PopSyCLE, we can construct our population model object.
[6]:
model = PopulationModel(population_samples = population_data, class_weights=class_weights, parameters=parameter_names, citation=citation)
(Optional) Visualize the Ouptut
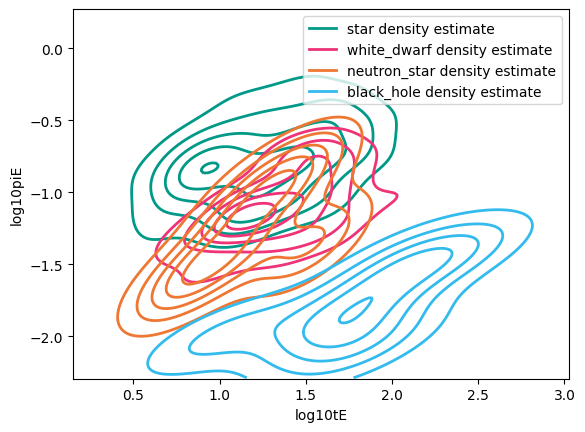
Optionally, we can visualize the data that we have packaged to ensure it matches our expectations. We can look at 1- and 2-D visualizations of the different possible combinations of parameters, separated by class. This not only helps to ensure the model was packaged accurately, but also helps to develop an intuition for which parameters may be relevant for classification.
[7]:
fig, ax = plot_population_model(model,["log10tE","log10piE"],legend=True)
plt.show()
plt.close()
Write the Model to an Output File
This will save the model to an ASDF file, called popsycle_test.asdf in ./data/. This model can be loaded in and reused for future classification.
[8]:
model_name="popsycle_test"
model.to_asdf(path=f"{dir_path}/data/{model_name}.asdf", model_name=model_name)
Contribute the Model to the Project
From the documentation, follow the contributer guide to setup a local branch and check it out.
The resulting ASDF file from above can be added to the model library directory, in
popclass/data/.The list of available models must be expanded by adding the model name (in this example,
popsycle_test). This is done by adding the name to the list inpopclass/model.pycalledAVAILABLE_MODELS.Finally, follow the contributer guid in the documentation to make a pull request.